4. Applying IRM with Transport Rules
Once IRM integration
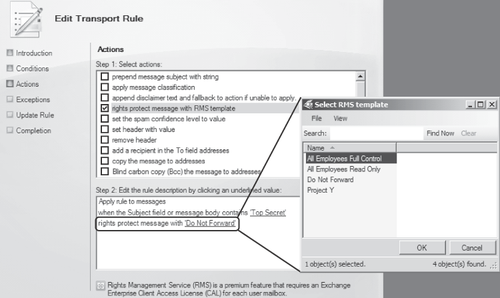
with Exchange Server 2010 has been implemented, the action Rights
Protect Message With RMS Template can be selected for a transport rule,
as shown in Figure 7.
The RMS template selected can be any distributed rights policy template
configured on the AD RMS cluster or the Do Not Forward client-side
template. IRM protection can be selected as an action for a rule on a
Hub Transport server only.
5. Configuring AD RMS for Exchange Server 2010
Before you can use the
IRM functionality in Exchange Server 2010, you must configure your AD
RMS infrastructure. Your AD RMS cluster must be Windows Server 2008 R2
or Windows Server 2008 SP2 with hotfix 973247, and the AD RMS Service
Connection Point (SCP) must be registered in Active Directory. In
addition, the AD RMS server certification pipeline must be enabled and
access granted to the Active Directory Exchange Servers group; this
must be configured on each server in your AD RMS cluster.
Finally, to enable IRM in Outlook Web App, IRM for Exchange Search, transport decryption, or journal
report decryption, the Federated Delivery Mailbox must be granted Super
Users privileges in the AD RMS cluster. The Federated Delivery Mailbox
is a hidden system mailbox that is created by Exchange 2010 Setup; the
Active Directory account associated by this mailbox is disabled by
default.
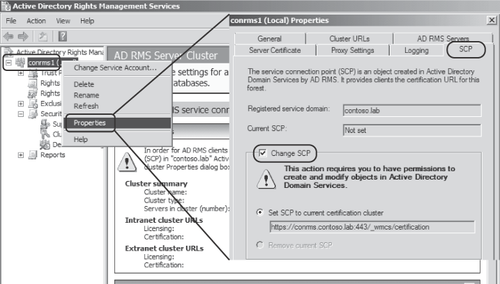
5.1. Registering the AD RMS Service Connection Point
You register the SCP for AD RMS by following these steps:
Log
on to a server in the AD RMS cluster with an Active Directory account
that is a member of the local AD RMS Enterprise Administrators group on
the server and a member of the Enterprise Administrators group in
Active Directory.
Start the Active Directory Rights Management Services management console from Administrative Tools.
In
the Active Directory Rights Management Services management console,
right-click the AD RMS cluster in the left-hand pane and select
Properties. Click the SCP tab in the properties dialog box, as shown in
Figure 8,
and then select the Change SCP check box. Click OK to register the SCP
and click Yes in the confirmation dialog box to apply the changes and
exit the Properties dialog box.
5.2. Configuring the AD RMS Server Certification Pipeline
Configure the server certification pipeline in AD RMS for Exchange Server 2010 integration by following these steps:
Log on to a server in the AD RMS cluster with an Active Directory account with local administrative privileges.
Click
Start, and then click Computer to open Windows Explorer. Navigate to
C:\Inetpub\wwwroot\_wmcs\Certification, right-click
ServerCertification.asmx, and select Properties to open the Properties
dialog box.
In
the ServerCertification.asmx Properties dialog box, click the Security
tab and then click Advanced. Click Continue on the Permissions tab of
the Advanced Security Settings For ServerCertification.asmx dialog box.
In
the Advanced Security Settings For ServerCertification.asmx dialog box,
select the Include Inheritable Permissions From This Object's Parent
check box, as shown in Figure 9, and then click OK twice to apply the change and return to the ServerCertification.asmx Properties dialog box.

Back
on the Security tab of the ServerCertification.asmx Properties dialog
box, select Continue to open the Permissions for
ServerCertification.asmx dialog box as shown in Figure 10.

In
the Permissions for ServerCertification.asmx dialog box, click Add and
then add the Exchange Server group from Active Directory, granting this
group Read and Read & Execute permissions to the file. Apply the
changes, and then close all dialog boxes to return to Windows Explorer.
Repeat Steps 1 through 6 on all other servers in the AD RMS cluster.